 Grades 7–8
 4 Sessions: 2 Hours Each
 Fantasy/SciFi, Informational, Narrative, STEMLessons
In this lesson series, students explore multiple STEM disciplines, and discover the importance of scientific modeling across various fields, all in the context of an upcoming zombie apocalypse.

Over the course of various hands-on STEM experiments, students will write not only notes detailing their discoveries and but also an ongoing narrative recording their fight against the undead.
In this lesson series, students explore multiple STEM disciplines, and discover the importance of scientific modeling across various fields, all in the context of an upcoming zombie apocalypse. This is a long workshop—four sessions—but easy to do; for the most part, it doesn’t require a lot of prep or materials, and you can do as many or as few sessions as you like. The handy-dandy slides walk you through every zombie step. It’s also incredibly fun and active, great for students who need to move.
Session 1 focuses on science: after playing a variant of tag (the classic school yard game), students will understand scientific concepts related to the spread of disease. The middle sessions explore engineering (building and testing structures and vehicles for zombie protection and evasion) and math (employing statistics and probability to explore projected outcomes for zombie survivability). The last session focuses on technology as a tool, not a toy; students will use a simple computer simulation to investigate a big problem (zombies, of course). All along the way, students will write not only notes detailing their discoveries but also an ongoing narrative recording their fight against the undead.
Zombies are fun. Zombies can also be educational. No surprise there; after all, their favorite food is braaaaaaains.
This lesson was inspired in part by an academic paper about stopping a zombie outbreak and a simulation of a zombie outbreak. Zombieism, especially in the modern sense, has a lot of parallels with real disease outbreaks, and we realized we could use it as a model for exploring epidemics. We came up with other zombie-related models, and here we are.
In this first session, we focus on the first zombie model—zombieism as infectious disease. By playing a fun variant on tag and mixing up the rules (in this case, testing different disease-control measures), students learn a lot about how infectious disease spreads in real life, and how to prevent that. To make things easier, we've prepared slides to guide the lesson.
A Note on Sections Titled “FOR YOU TO KNOW (AND YOUR STUDENTS TO DISCOVER)”
This lesson comes from the published 826 collection STEM to Story. Lessons in the collection cover a wide array of science, technology, engineering, and mathematics topics, and we recognize that few educators will be comfortable with all of them. The lessons were designed to focus on discovery and exploration, so we encourage you to explore and learn alongside your students. To bring you up to speed quickly, each lesson from the publication includes a section or sections titled “FOR YOU TO KNOW (AND YOUR STUDENTS TO DISCOVER)”, which provides some background on the subject at hand. This is to give you a solid foundation before you teach. Because it’s all very interesting, this section is also useful at parties, letting you dazzle your fellow guests with your knowledge of STEM facts and trivia.
This section is for you—and not the students. You shouldn’t feel like you have to read it, and you certainly shouldn’t feel like you have to teach it. If you do choose to teach this material to students, we’ve found it’s best not to introduce these ideas or vocabulary words at the beginning of a lesson. As a lesson progresses and students are sharing their observations and ideas, it will usually become clear that they have discovered many of these concepts for themselves. You can then help them by providing labels (the vocabulary words) to hang on the scientific ideas they have already described in their observations. As you do this, try to draw on students’ own language in connecting their observations and ideas to the “scientific” language. If, at the end of the lesson, your students haven’t learned what they were “supposed” to, resist the urge to give it to them. Their questions and curiosity will do a better job of motivating learning over the long term. Waiting is powerful—and you will see the results in what your students do and learn.
15 minutes
It Was Just a Normal Day …
It’s a clichéd opener, but here we’re going to have fun with it. Students should write about all the normal things they (and their family and friends) have done this week, in response to the following prompt:
What is a normal week like for you? Who are the people you come in contact with? What are the things you usually do? Where are the places you go, and when and how often do you go?
15 minutes
Let’s Get to Know Each Other!
Even if your students do know each other, this is an opportunity for them to get to know each other better. But really, the reason to do it is that it models the spread of disease.
Distribute the “Zombie-Fighting Skills” handout, and tell the class that their goal is to talk with everyone in the room, asking each classmate about his or her best zombie survival skill (foraging, running, grappling, MacGyvering, and so on). Everyone should write down these names (in the order in which they meet people), and each classmate’s skill.
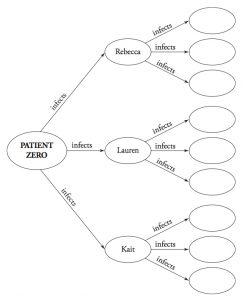
Halfway into this activity, or once someone has talked with everyone, shut it down, and introduce the surprise: there has been an infection! Move everyone to one side of the room. You can declare yourself patient zero, or select a student at random. (True randomness is best; if necessary, shut your eyes and point!) Patient zero will move to the other side of the room. Ask patient zero who the first three people he or she met with are. Those people have been infected! They should move across the room. They should look at their list for the person who infected them (patient zero); the next three people after patient zero have been infected as well!
If you can, draw a bubble map on the board, like the one that follows, detailing the spread of disease. In any case, the class will discover that almost everyone, if not everyone, has been infected. D’oh.
15 minutes
What Do We Know About Disease?
Ask your students what they know about disease. What is disease, and how do people get a disease? (You can use this opportunity to debunk some common misconceptions.) What does disease have to do with the first activity?
HOW WE DO (AND DON’T) GET SICK
Despite all we know about illness, there are still a lot of misconceptions about when, why, and how we get sick. Here are some basic facts:
After some good points, switch up the discussion: What do we know about zombies? How do people become zombies? Ideally someone will say that people become zombies after being bitten by a zombie. Sounds a lot like disease spread, right? A lot of modern writers of zombie fiction actually have written about zombieism as a rabies-like disease, spread by a virus or a fungus or something similar.
They’re kinda the same, aren’t they? And how are they different? Compare and contrast disease and zombieism on the board for a bit, then let students know that they’ll explore both through a game—namely, tag.
40 minutes
Infection Tag and Zombie Tag
This section can vary in length; if it runs short, you can do some optional activities to explore these ideas even further. If it goes long, you can cut a little of the time from the writing prompt.
For all tag variants, have a strict no-running rule. Also, let students know that the goal isn’t to win; it’s to learn about disease. It is possible to cheat here, but it doesn’t help anyone.
Have your students play infection tag for about ten minutes. Start them off with the simplest version: Every student should have a sheet of stickers. Select three to five students to be the initial infected (you can choose randomly, or ask for volunteers—students will happily do this), and have them try to stick stickers on their classmates. Students should walk about randomly, and not as if the infected are attempting to infect others, or as if the uninfected are trying not to get sick—the goal is to simulate random human interaction. (Students will have both of these options later.) When someone has a sticker attached to him or her, he or she becomes infected, and should start sticking stickers on people as well (note that a person can be infected more than once by our sticker disease, as with diseases in real life). See how long it takes for the whole room to be infected.
After the first round, ask students how people might prevent disease spread. Come up with a way to vary the rules of the game to test this. Here are a few examples:
After a few rounds of infection tag, help your students reflect for five to ten minutes on what they’ve learned about the spread of disease, perhaps in small groups and/or in writing, using this prompt:
Now that we’ve experimented with quarantine and immunization, what do you think is the best way for stopping disease spread? What are the pros and cons of different methods? Why might people like or not like them?
Next, move on and play zombie tag for fifteen to twenty minutes. Essentially, this is the same as infection tag—except that instead of stickers signifying infection, the infected walk about with arms outstretched, moaning “BRAAAIIINS.” Note that the zombie walk, at least in the beginning, should be a slow shamble. Again, as always, track how far and fast the infection spreads!
Here are some starter ideas for more variants:
After all the zombie tag, hammer home this point: There is a big, big world out there. And one of the ways STEM people deal with that is by making models to understand it. Some of the most powerful computers in the world run models on things like weather and climate. Sometimes we build scale models of things like buildings and bridges. And sometimes, yes, even games can be models, like infection tag and zombie tag. Can your students think of examples of models?
20 minutes
The Day the Zombies Came
Now that your students have zombies on the brain, let them know that they’ll be writing a full zombie narrative, piece by piece, throughout the lesson sequence, drawing from their STEM discoveries. Today, they’ll begin with the opening. Give them this prompt to get them started:
When did you first hear rumors about the zombies coming? Did you believe them? Were those rumors accurate (did some of the facts change)?
And when did you first encounter a zombie? How did you and others try to avoid being infected?
This can tie into hypotheses about how the outbreak began: perhaps their characters saw in the supermarket an issue of the National Enquirer that had an article about zombies in Haiti created by voodoo, for example. Maybe it was via the radio, or a phone call. Maybe it was supposedly a rabies outbreak (as in World War Z). Maybe they saw a zombie, and it went for their brains. Whatever it was, let’s allow them to get crazy creative here, until …
IMAGINATIONS UNBOUND
Note that your students may be inclined to write the kind of gory zombie narrative with which they may be familiar. That’s not the point of this lesson, and indeed, throughout, you and your students will consider why such narratives are unrealistic (for example, why taking a chainsaw to a zombie horde may be the worst idea). Instead of directly instructing your students to stay away from this kind of writing (which may have the opposite of the intended effect), make sure your directions and questions focus on exploring the human side of things (for example, preparation and aftermath) and on integrating the lessons they’ve learned into their narrative. Even with this subtle redirection, it may take some time for your students to shift from blood and guts to more thoughtful writing.
15 minutes
The New Abnormal
After students have written the start of their zombie account, remind them of what they wrote at the beginning of the session. How would the spread of zombies affect their ability to live their lives as they normally do? We’re going for some silent, somber reflection and writing here:
Think back to the everyday activities you wrote about at the beginning of today’s session. When the zombies come, can you still do those things? How might your life have to change? How might society have to change?
If time permits at the end, you can have students share their writing and thoughts. Alternatively, you can try some advanced variants on infection tag or zombie tag—for example, students can designate physical barriers (like table forts) to simulate fortified quarantine zones.
At the very end, students’ mood may be pretty down. This is intentional. It is important to raise spirits for next time, however, so you should let your students know that humanity strikes back!
In this session, students return to a type of model that they are likely more familiar with: the physical scale model. Using bits and pieces of household materials to represent things that may be available during the zombie apocalypse (such as a bit of string, representing rope), students will engineer structures and vehicles to aid humans in the fight against zombie kind. Students will be pretty busy engineering for most of the session. If, by any chance, they find themselves with any idle time, help them figure out how they can expand their notes on their engineered structure and engineering process. And if that's entirely taken care of, students can, of course, work on continuing their zombie narrative.
Note: Amounts given in materials are per station; you may need more.
This session requires a little more prep than the others. Students will be building structures (a bridge, zip line, raft, or collapsible ramp) in groups of four, and there are two ways you can do this: (1) you can decide what each group will build, or (2) you can let the students decide. Option 1 requires more prep but ensures things go more smoothly.
If you’re going with option 1: Before class, designate building stations, labeling them bridge, zip line, raft, and (optional bonus) collapsible ramp. You’ll need one station for every four students, so if you have, say, thirty-two students, you’ll need eight stations, or two of each kind. Try to locate each zip line station near a door; they’ll need the door to set up the line. At each bridge station, you’ll need two flat, raised surfaces to bridge (tables and chairs work well). Place them fifteen inches apart, or farther for more of a challenge. Fill the foam cooler with water and place it somewhere it won’t get knocked over. Then distribute the building supplies (see the materials list or the “Zombie Apocalypse Building Supplies” handout). Different stations will require different supplies, but the supplies will overlap a bit, so you can do whatever seems easier, either putting the relevant supplies right at the stations or setting up a single central supply area.
If you’re going with option 2: Place all the building supplies (see the list of materials at the beginning of this lesson, or the “Zombie Apocalypse Building Supplies” handout) at a central supply area. Fill the foam cooler with water, and place it somewhere it won’t get knocked over.
15 minutes
My Stuff
We begin with a tweak of the first session’s prompt, focusing more directly on things. Ask the students to respond to the following:
What are the things you need and use in everyday life? Which things are most important, and which things can you live without?
If students generate this list really quickly, have them revisit their fictional narrative from the previous session and extend it, focusing on the supplies they need to gather and use to survive the zombies.
10 minutes
Zombie Stuff
Now, the class will explore the concrete ways people’s lives might have to change. Ask students to respond to the following prompt:
How easy or hard is it to get these things when zombies are around? What should go in your emergency zombie kit? Can you carry this emergency zombie kit comfortably?
Distribute copies of the “Zombie Apocalypse Survival Supplies” handout to help students consider what they can carry. Try to leave at least a couple of minutes to briefly discuss with your students what they have prioritized and why.
For example, students may think that they can forage for food or water in the wild—and maybe they can. But help them think clearly about this. Where would they find food or water? Would the water be clean? Are a few berries enough? Would they rather move as fast as possible, or have to hunt and gather, possibly in places where there are lots of zombies (like an overrun grocery store, perhaps)?
Students are likely to overestimate the amount they can carry—to drive home a point, you can have some backpacks to fill up with heavy things like weights, bricks, bags of rice, and bottles of water (an eight-ounce bottle of water weighs about half a pound; a one-liter bottle weighs about two). Have a bathroom scale on hand so they’ll know what the full backpack weighs. Let them explore how much they can carry, comfortably, for even a few minutes. When they are trying on the pack, ask them if they think they would be able to run—over obstacles—to escape from zombies.
FIGHTING WORDS
Anyone who’s ever watched a zombie movie or played a zombie video game knows that it typically takes more than a cutting comment to take down a zombie. And when considering what supplies they’ll need, your students, naturally, may want to load up on flamethrowers and other forms of heavy artillery. We can see their point, but we don’t recommend granting it. Tell the students that weapons won’t be on anyone’s supply list, explaining, if they need an explanation, that zombies are impervious to them.
The real explanation is that, from a narrative point of view, weapons are lazy. When you have a lot of firepower, there’s not a lot of conflict; the outcome is already predetermined. It’s much more interesting if characters have to rely on their wits instead. As Max Brooks advises in The Zombie Survival Guide, “Remember, no matter how desperate the situation seems, time spent thinking clearly is never time wasted.” This is basically the unofficial motto of this lesson, and you’ll love to see what your clear-headed students come up with.
45 minutes
The Zombies Are Coming
Take five minutes, and only five minutes, to present the engineering tasks to the students, explaining that they will be tasked with building the following structures to help them escape from the zombies:
Return to the concept of modeling, and explain how various materials in this session (for example, craft sticks, string, and Bubble Wrap) model various things in the real world (lumber, rope, and pillows, respectively). Hand out copies of the “Zombie Apocalypse Building Supplies” sheet to help them see this modeling.
If you’ve already set up building stations (preparation option 1) for each BRIDGE, RAFT, ZIP LINE, and COLLAPSIBLE RAMP group, assign four students to each station and let them get to work.
If you’re letting the students decide themselves what to build (preparation option 2), divide them into groups of four, then explain what’s going on—the zombies won’t wait for us, so we have to finish on time. Let students know that hopefully they’ll be able to decide in the next ten minutes which groups are building what, so that there will be a full thirty minutes afterward to design, build, and test. (And if they can decide more quickly, they’ll have more time!) Ideally, the entire class should produce approximately equal numbers of each structure. Two bridges, three rafts, and two zip lines are okay; six zip lines and a bridge are not. Otherwise, don’t be too directive here; some chaos will make a point about teamwork and leadership. In addition to deciding which group will build what, students should also come up with the best way to divvy up supplies.
For the remaining thirty minutes, give or take, students will engineer their assigned structure, hoping to be ready when the zombies arrive. They can test and observe while building, and take notes about what works and what doesn’t. (Note: The zip line group can’t test with an egg while building—because an egg, in their miniature world, is a person.)
Although you could ask students about prior knowledge before they start (What kinds of shapes have you seen that form bridges or rafts? What do you know about keeping people or things safe in vehicles?), it is entirely fine, and maybe even preferable, for them to have very little guidance. Engineering does rely on using known principles to devise solutions—but, perhaps more fundamentally, it relies on testing and retesting, building and rebuilding, to refine solutions. The emphasis here is on iteration.
10 minutes
But Does It Work?
Once time is up, instruct students to stop wherever they are. Let them know that the zombies won’t wait for them to finish. It’s time to test their structures, taking notes as they do so. What worked or didn’t work as expected? What were the weak points in the design that need to be reworked?
Have the RAFT students place their rafts in the water, and the BRIDGE students place the appropriate weight in the center of each bridge. We’ll come back to these tests in a few minutes (it’s not helpful if a bridge or raft only works for thirty seconds).
While this happens, supervise the ZIP LINE students as they send their vehicles (with eggs) down the zip line, and then return to note the results for the RAFT and BRIDGE students. (Note: You may want to place a plastic garbage bag on top of the landing surface for the zip line to make cleanup easier, should the VIP egg not survive.) If time permits, the entire class should watch each test, one by one; it’s a great big team-building exercise, and the collective applause after an egg survives the zip line is a great thrill.
25 minutes
The Zombies Are Here
This is an engineering lightning round. The zombies will be here, so the students’ structures and vehicles absolutely need to be ready!
Based on their notes, students need to engineer things better than ever! You can add on challenges, like: An extra person needs to fit on the zip line! We have extra supplies, and it would be great if there were room on the raft! A longer bridge would help us access the supplies in that grocery store!
Students have less time for this segment, but more knowledge. Each group should test by itself toward the end of this window. (After all, if every group gawked at every other group’s test, everyone would lose time to prepare for the zombies.) You should be present, of course, to note how groups did the second time around. Some students ideally will discover that they can reuse pieces of their old structure, which is great—and resourceful.
For even more of a challenge: If you feel that the groups are up to it, you can rotate them so they do different tasks and have to rely on the previous group’s knowledge and notes. If you have the time and interest, feel free to extend this engineering into an additional session or two!
15 minutes
Paying It Forward in the Zombie Apocalypse
To help students reflect on their structure and what they learned along the way, have them write instructions on how to build a bridge, zombie escape raft, zip line, or collapsible ramp, to leave for people who come after them. (As with everything else in this lesson, this should be written from the perspective of a character living through the zombie outbreak—so a craft stick is not a craft stick, but instead a two-by-four or a plank ripped from a picnic table.) Students should be drawing from any and all notes they made during their model design and construction, in either phase.
When students are first introduced to probability and statistics, they're usually taught how to calculate things like mean, median, and mode—which summarize the data we have. This is often called descriptive statistics—and although it's important, it's certainly not the only use of statistics. Another branch, statistical inference, aims for much more than summary. It seeks to pull conclusions and draw meaning from limited data sets. It's how pollsters can draw conclusions from the general population, and be pretty accurate, by only asking a hundred people. Statistical inference and its associated math are beyond the reach of the average middle schooler, and this session doesn't aim to teach it. What it does do is engage students in a process called re-sampling. Though it's simplified and simulated here, it still hints at the power of math and statistics in conducting some really cool investigative work—about zombies, of course. Specifically, students here will use resampling of a collection of zombie data to make good guesses about even more zombie data. Conveniently, while doing this, students will also learn about mutation and natural selection.
Very simple prep this time—just prepare some stickers for the zombie mutation dice game. You’ll need one sheet for every 4 students. On each sheet, on one-third of the stickers, write pow! On another one-third, write brains. And on the final one-third, write footprints.
During class, it’s simplest—and the most fun—to have students play the dice games in groups of four. If necessary, rearrange students’ desks or tables to facilitate this.
ZOMBIE DICE AND D20S
This session is built on a modification of the commercially available dice game Zombie Dice, by Steve Jackson. The game is widely available both online and in retail game stores and bookstores. It also uses D20s. A D20 is a twenty-sided die that is most used in the role-playing game Dungeons and Dragons. Such dice are also really easy to come by, online and at game stores.
25 minutes
The Story So Far—Are We Winning?
This third session opens with some writing and reflection. First, ask students to imagine how they might use engineering not just to escape but to fight back. Have students spend ten minutes responding to the following prompt:
Continue your zombie story, focusing on how thinking ahead, preparing, and engineering helped us fight back. You can focus on things we’ve built (that is, the bridge, zip line, raft, or ramp), or things that you imagine you might build. What will help us win this war?
Make sure to remind students how scarce resources are in the new, zombie-scarred world—so they probably won’t be able to build antizombie robot exoskeletons or anything like that. But they might be able to come up with clever antizombie traps—we’re sure your students can think of some.
After this, ask them to think about how they might start to rebuild the world after pushing back the initial wave of zombies. Give them fifteen minutes to respond to the following prompt:
With engineering smarts on our side, we’re seeing fewer and fewer zombies!
The waves of zombies have taken a toll, though. There are a lot fewer of us. And the places we live, work, and go to school are not in good shape.
Continue your story, writing about how we start to rebuild our lives.
25 minutes
Meanwhile …
Of course, some zombies have survived. We haven’t gotten them all. Ask your students what kinds of zombies might have escaped their traps and other devices. They might answer with strong zombies, fast zombies, and/or smart zombies—which all may potentially cause trouble later.
Let your students know that the folks in charge, whoever they might be, have sent out research patrols to find out more about the surviving undead. There seem to be three different strains: red, yellow, and green. Conveniently, researchers have made six observations of each zombie strain meeting a human, and they’ve been able to create a mathematical model that fits on a set of dice.
Show students the zombie dice. They come in green (representing the green zombie), red (representing the red zombie), and yellow (representing the yellow zombie). Explain that each side of the dice represents one of the observations researchers have made. For example, for the yellow zombie, there have been two observations of humans being successfully attacked and turned by a zombie, two observations of humans successfully escaping, and two observations of humans fighting back and injuring the zombie. Researchers have also been able to determine that three major injuries to a zombie usually mean it’s taken out of commission.
Students are going to use this model to simulate the life of a zombie, and see what kind of havoc it might wreak on the human population.
Explain the rules:
Each die roll represents an encounter between a zombie and a human.
If you roll a BRAIN, it means the zombie gets a brain. (Poor human.
When you roll a set of FOOTPRINTS, the human gets away. (Lucky human.)
A pow! means the zombie has been injured. (Three injuries mean a zombie has died. Go humanity!)
Distribute the “Zombie Modeling” handout, and take a few minutes to go over it. Everyone will need three copies, one for now and two for the zombie mutation rounds that follow in just a bit. Students should choose a red, green, or yellow zombie die, and use the handout to record the result they get for each roll. (The handout has space for fifteen rolls. It’s not unheard of for a green zombie to survive seventy-plus rolls without accumulating three pow!s. You can encourage students to do longevity studies later.)
It’s fun to play in groups of four. Have groups do a couple of runs through the different zombies, and discuss the differences. Have them make a game of it, hypothesizing which zombies are best at living long, can eat the most brains before dying, and so on. Note-taking is important!
YES, THIS IS ACTUAL STATISTICAL WORK
It’s simplified, but yes, this is definitely statistics. A lot of the time, researchers have limited data—a sample—about a phenomenon. They might want to understand something about an entire group of people or things (for example, What happens when zombies and humans interact?), but they can’t possibly test every possible scenario (that would require all the zombies and humans out there!). Still, sample data can be used to draw some conclusions that can be generalized to the broader population. We can imagine that if the humans in our sample generally don’t fare well against zombies, this is probably the case for all humans. One way we can use our sample data to understand more about broader phenomena is through resampling—pulling samples from the already collected sample set, and analyzing them to figure out as much as possible about the phenomenon or population the we are trying to learn about.
In this fictional scenario, we don’t want to draw too many more samples about zombie-human interactions because doing so probably means putting more humans in more danger. The six sides of the zombie dice represent a sample of the full range of possibilities that might happen when humans meet zombies, and every time we roll a die, we pull a sample from this already existing sample set. Thus, the dice serve as a sort of model—each roll represents the outcome of an independent human-zombie interaction, and we can easily run large numbers of simulations to get a sense of the likelihood of each outcome, should there be a large-scale zombie invasion.
On a side note—two particular kinds of resampling have particularly cool names: jackknifing and bootstrapping.
Save seven to ten minutes at the end of this section to look briefly at some of the data students have collected. On the board, put up tally marks for the data bulleted in the list that follows. You can also improvise histograms (a histogram is another name for a bar graph) by using a sticky note to represent each data point (see the “Histograms and Zombie Data” sidebar).
HISTOGRAMS AND ZOMBIE DATA
After simulating zombie lives with zombie dice, every student will have determined that every zombie has eaten a certain number of brains (using the “Zombie Modeling” handout). Say that this is our data set:
{6, 8, 11, 12, 4, 13, 7, 6, 2, 1}
To make things easier, let’s sort it:
{1, 2, 4, 6, 6, 7, 8, 1, 12, 13}
We can use tally marks to show how many zombies ate how many brains:
|
0 to 3 brains |
4 to 7 brains |
8 to 11 brains |
12 to 15 brains |
|
II |
IIII |
II |
II |
|
(Two zombies ate 0 to 3 brains.) |
A histogram will help us to better visualize the data. If every sticky note represented one zombie, we’d have:

Clearly, most zombies are eating eight to eleven brains in this example!
It’s probably not feasible to use one sticky note per zombie. Look at this example:
|
0 to 3 brains |
4 to 7 brains |
8 to 11 brains |
12 to 15 brains |
|
6 |
14 |
8 |
4 |
That would take a lot of sticky notes to represent!
25 minutes
Zombie Mutations, Round 1
Now it’s time to explore the concept of mutation. Bring out some D20 dice, along with the zombie mutation stickers you prepared ahead of time and the “Mutation Rules” handout, which explains the mutant variants, their prevalence, and how they operate within the game. The story goes that there are now reports coming in of MUTANT ZOMBIES: for example, some that are expert hunters, some that are almost invincible, some that break their legs really easily. We need to learn more about them. Point out that like in real life, some of these mutations are helpful to the zombies, some are harmful, and some don’t help out all that much. Some are also more prevalent than others.
In groups of four, have students take turns rolling the D20 to determine the mutations for the zombies at their table. If a student rolls a 3, he or she should create one broken-leg zombie by putting a pow! sticker over the footprints on a zombie die pulled randomly from the zombie dice cup.
Have them hypothesize about how effective these mutations will or won’t be. Do a number of rounds here—the goal is to gather data and test hypotheses. This should be fun-filled and feel fast—it’s inherently gamelike. Students can own their mad scientist side and their pet zombies, if they like, and engage in direct competition with partners.
They should investigate as many different zombies as possible. There are 18 zombie mutants (3 colors ×6 mutations).
After every round, students should write a couple of sentences summarizing their observations on their “Zombie Modeling” handout. These can be partially fictional and, if you like, can give students an outlet for letting their zombie ideas run wild. (These notes aren’t part of the main zombie narrative they’re writing.) Should you have extra time, students can write tactical plans for facing some of the most interesting strains. When one encounters a zombie that’s better at stalking its prey, how does a person or community evade or resist that zombie differently than when dealing with a normal zombie?
20 minutes
Zombie Mutations, Round 2
Here, students will mimic natural selection. In groups of three or four, have them figure out which of their zombie mutations was most successful. They can define success by zombie survivability (which got the fewest pow! stickers) or zombie lethality (which got the most BRAINS stickers). This should take five minutes, maybe a little bit more. Once every group has determined the most successful zombie, they can all share a tidbit of info on it. (For instance, the green stalker zombie ate twenty-nine brains!)
Announce that these zombies have become dominant, and that they will evolve again (now), as organisms do. Have them, once again, roll D20s and mutate their survivor strains. The goal is to see whether any doubly mutated zombies are extra strong. (The answer: probably yes.)
25 minutes
Oh, the Horror …
Students will end by using the data they’ve collected, and their imagination, to write about another turn of the tide in the zombie war. Now that they’ve observed some of these new and terrible mutant zombies, and figured out what they’re capable of, they should write a story about how these new zombies and their abilities make a comeback (students can opt to create further mutations, but maybe they don’t need to—a mutant green hulking stalker is basically invincible and unstoppable), and how they go through civilizations already on the brink. Push them to talk about how the zombie mutations—speed, intelligence, strength—help them counteract the zombie defenses humans have engineered. And, of course, they should write a bit on how some of the humans escape doom yet again, preferably through even more ingenuity.
One of the reasons we use models is that testing the real thing is unethical or implausible. In the case of the zombie apocalypse, it's currently impossible to test the real thing, as there's no one we can infect with zombieism—but even if it were possible, it would be both unethical (to turn a human into a zombie) and implausible (to infect everyone in a city as a test). This is where technology comes in. Technology has enabled us to do some pretty fun things, and indeed, fun is one of the most common uses of technology. Today, our mobile devices are more powerful than the computers we (adults) grew up with, and a lot of their power goes to social media updates, video games, or video streaming. These, of course, aren't the only ways to use technology. The most powerful computers in the world are used for things like determining how drugs interact with your body, predicting climate changes over time, and simulating the way stars and galaxies are born and die. These are huge. In this session, via a simple computer simulation, students will get a taste of a practical use of technology beyond creating a slideshow for school. They'll tweak the variables in a zombie simulation to assess possible solutions to our fictional zombie crisis, and make recommendations based on their discoveries. (Students won't be creating the simulations themselves, as that's beyond the scope of this lesson. The source code for the simulation is accessible online, though, so those who are motivated can look into it and change things around.)
Before class, spend a little time familiarizing yourself with the “Zombie Infection Simulator”. You’ll also need to set up a computer with a projector so the class can see the program run during the lesson.
A Note on Sections Titled “FOR YOU TO KNOW (AND YOUR STUDENTS TO DISCOVER)”
This lesson comes from the published 826 collection STEM to Story. Lessons in the collection cover a wide array of science, technology, engineering, and mathematics topics, and we recognize that few educators will be comfortable with all of them. The lessons were designed to focus on discovery and exploration, so we encourage you to explore and learn alongside your students. To bring you up to speed quickly, each lesson from the publication includes a section or sections titled “FOR YOU TO KNOW (AND YOUR STUDENTS TO DISCOVER)”, which provides some background on the subject at hand. This is to give you a solid foundation before you teach. Because it’s all very interesting, this section is also useful at parties, letting you dazzle your fellow guests with your knowledge of STEM facts and trivia.
This section is for you—and not the students. You shouldn’t feel like you have to read it, and you certainly shouldn’t feel like you have to teach it. If you do choose to teach this material to students, we’ve found it’s best not to introduce these ideas or vocabulary words at the beginning of a lesson. As a lesson progresses and students are sharing their observations and ideas, it will usually become clear that they have discovered many of these concepts for themselves. You can then help them by providing labels (the vocabulary words) to hang on the scientific ideas they have already described in their observations. As you do this, try to draw on students’ own language in connecting their observations and ideas to the “scientific” language. If, at the end of the lesson, your students haven’t learned what they were “supposed” to, resist the urge to give it to them. Their questions and curiosity will do a better job of motivating learning over the long term. Waiting is powerful—and you will see the results in what your students do and learn.
15 minutes
Let’s Think for a Bit (Since Zombies Can’t) (15 minutes)
Present students with the following prompt to write about individually, or discuss as a group. Emphasize the modeling portion—after all, we don’t want to have to have an actual zombie apocalypse to prepare ourselves for one.
Think back to everything we’ve learned and everything we’ve modeled. What do you think are the best ways to fight off the zombies? How can we test this plan?
10 minutes
The End Is Near, Unless We Can Use ZombieSim to Save It
Explain that, thanks to students’ efforts and engineering in session 2, key researchers (and a test subject) were able to get to a Centers for Disease Control and Prevention bunker, where they have developed a working zombie vaccine. Hooray! Now we finally have a critical tool against the zombies. And thanks to their research, data, and tactical plans, our security forces can better fight back against zombie monstrosities like the green hulking fighter and the green hulking stalker.
But now, it’s time to put together a plan to save our remaining cities. How will we know if the plan will work? We can’t just test a plan on live people.
Pull up ZombieSim on the screen and demo things briefly. Explain that this is a model for testing strategies and variations on a large scale.
Distribute the “ZombieSim: What’s Going on Here?” handout to give students some helpful hints. Then, run the simulation—show how students have to randomize a city, then change settings to initiate the population, then run things one day at a time. They can turn the animation off to speed things up (especially important for the large simulation that is to come).
15 minutes
Saving Tiny Town, USA
Tell your students that during their travels, they have come across a small town about to be overrun by zombies. Being the good-hearted people they are, they will come up with a plan to save the town. They should use Zombie Sim to try out different plans. Distribute copies of the “Zombie Defense Simulations” handout, and instruct students to use it to record their results. (To help guide them, remind them about the importance of isolating variables.)
15 minutes
Saving MediumVille, USA
Your students have saved Tiny Town!
Now, they’ve found another town about to be overrun! Thankfully, they’ve met like-minded antizombie strategists here. (That is, now you’re putting students into small groups.) Students should report their individual findings from Tiny Town to their group, and determine together how best to save a medium-size town—again using the “Zombie Defense Simulations” handout to record their experimental data.
At this point, tell students that resources are hard to come by, so they should watch their costs and try to keep them down as much as possible. What antizombie measures offer the best bang for the buck?
15 minutes
Saving the Big City
Let students know that the world’s remaining leaders have heard of their success stopping zombie outbreaks. Now, they want them to determine a plan to save major population centers.
With their group, students should create a plan, gather data, and prepare to present their findings to the leaders of the free world.
Resources are very scarce at this point; don’t let your students forget that.
30 minutes
Let’s Save the World, Mrs. President
(If you have a lot of students and groups, and therefore a lot of simulations and presentations to do, you can cut short the “Saving the Big City” section, as there’s a tiny bit of overlap.)
In front of the whole class, using the Zombie Infection Simulator, set up a large city with the animation off. Take about twelve minutes to simulate student plans. On a large city with animation off and twenty zombies to start, run each group’s plan three times. Determine the average number of humans saved after seven days, and how much it cost to save each person (the plan’s cost divided by the average number of humans saved). Get the data up on the board.
Allot ten minutes total for student groups to present their plans to the fictional president. What zombie-control measures are the most important to them? How do they measure their success (for example, fewest humans zombified, most humans alive at the end, lowest cost, fastest zombie eradication, and so on)? Two minutes per group is about right.
After all the simulations are run, use the rest of the time (maybe eight minutes) to discuss what kinds of plans are best, and why. Students should continuously refer to the data they’ve gathered, both in groups and from the simulations in front of the class. (Although the focus is on the variables they’ve experimented with during this session, they can definitely refer back to concepts explored in earlier sessions—most relevant are probably disease-control mechanisms from session 1 and survival packs from session 2.) How might they combine aspects of different plans to make an ultimate plan?
20 minutes
Conclusion:The Day the Zombies Died (Maybe?)
After all that hard work, it’s time for a debriefing. Ask students to respond to the following prompt:
Write a story about the last day of the zombie apocalypse, drawing on the results of the final ZombieSim runs. If the zombies won, you should write about how humanity’s last stand failed. If the humans won, instead write about how our plan to fight off the zombies worked.
You should still write from the perspective of the same character you’ve been using throughout the lesson in the zombie wasteland. That person can be in the midst of the antizombie uprising, or can even be its architect who’s watching from a distance. What is it like implementing these antizombie measures (and any others you may have learned about in earlier sessions) and seeing them in action?
And no matter what, you should write about what the world is like after the zombie apocalypse.
Should students wrap up early, have them read some of their writing aloud.
FOR YOU TO KNOW (AND YOUR STUDENTS TO DISCOVER)
Information is derived from the following sources:
Using zombieism to study infectious diseases? Really? Although it might initially seem like an off-the-wall idea, it really makes a lot of sense. Scientists routinely use models in their work, but models are similarly important for teaching and learning. In this case, our model, zombieism, provides an engaging context in which to teach students some pretty sophisticated ideas about disease and its spread and prevention. These concepts are traditionally taught in very abstract ways and can thus be perceived as boring. Zombies help bring these ideas to life (pun definitely intended) and give students concrete experiences onto which they can anchor their developing understanding.
Disease
Diseases are often divided into two main categories: infectious (also known as communicable) diseases and noninfectious (also known as noncommunicable) diseases. Briefly, noninfectious diseases include congenital diseases (diseases or conditions that you are born with, such as metabolic disorders like phenylketonuria or nervous system disorders like spina bifida), as well as other diseases that can’t be transmitted from person to person, such as asthma, diabetes, and many cancers. Infectious diseases, in contrast, are caused by an infectious agent (most often a bacterium, virus, fungus, or parasite) and are defined by the fact that they can be transmitted from animal to animal (both within a species and across species). You are probably familiar with many infectious diseases—including those of viral origin, such as colds and the flu; bacterial origin, such as strep throat; and perhaps even parasitic origin, such as malaria. Notably, the preventable childhood illnesses that we typically receive vaccinations against (polio, measles, and pertussis [whooping cough]) are also caused by infectious agents, both viral and bacterial.
Disease Outbreaks
A disease outbreak is formally defined as a higher incidence of a particular infectious disease occurring in a population or region than would otherwise be expected. The flu virus is generally circulating all year long. However, we start to see flu outbreaks (larger numbers of people getting sick from the flu virus) typically when the weather gets cold (and people spend more time in close proximity to one another, indoors). Like the zombie outbreak in the lesson series, disease outbreaks begin with the introduction of the infectious agent into a population. This can happen in a number of ways, among them:
Limiting the Spread of Disease
Throughout history, humans have used several ways to limit the spread of disease, some more effective than others.
Quarantine, from the Black Death to Zombies
Europe was ravaged by multiple Black Death (also called the plague) epidemics during the Middle Ages. The Black Death or plague spread rapidly and was highly lethal (the plague epidemic that began in the 1330s is believed to have killed 60 percent of the European population). Although the cause of the plague was not identified at the time (in fact it would be several hundred years before Anton von Leeuwenhoek built the first microscope and was the first human to realize that there is a universe of microbes that we cannot see with the naked eye), repeated experience with plague epidemics led to organized attempts to limit its spread. Cities began to establish “sanitary cordons” to prevent strangers and particularly traveling merchants from entering the city. In port cities, these cordons included isolating boat passengers, crew, and cargo in buildings separated from the city for forty days.
Quarantine proved a useful strategy to limit disease spread. Quarantine was routinely used in the twentieth century to isolate individuals exposed to such diseases as scarlet fever and measles—and its use continues in times of public health emergencies. Most recently, quarantines were established during the severe acute respiratory syndrome (SARS) outbreak in 2002–2003.
The use of quarantines, although they can be an effective strategy to limit disease spread, is tricky, as quarantines have significant financial implications and raise ethical questions. How do you know who should be quarantined? For how long? Who takes care of them during this time? How do they make up lost time at work or school? and so on. How would this strategy translate to a zombie outbreak?
Washing Away the Filth
The idea that washing hands specifically and sanitation and cleanliness more generally could help limit infection was revolutionary.
In the eighteenth and nineteenth centuries, the second-highest cause of death for women of childbearing age was childbirth fever (puerperal fever). In the 1840s the Austrian physician Ignaz Semmelweis noted that women who gave birth at home with a midwife had much lower rates of childbirth fever than women who gave birth in a hospital (where nearly 40 percent of women giving birth were dying). This got him thinking, and he conducted an experiment in which he had all physicians wash their hands in a bleach solution between patients. Infections decreased by more than 90 percent on his ward. His work provided evidence that doctors were largely responsible for the spread of this disease (though doctors were offended at the thought and were slow to adopt this simple reform), moving from patient to patient without washing their hands (and sometimes even moving unwashed from the autopsy of a patient who died of puerperal fever to a live patient). The importance of hand washing (and sanitation much more generally—think about living in a city in the time before closed sewers carried away waste) is now widely known, and hand washing limits the spread not only of serious infections acquired in hospitals or elsewhere but also of such common illnesses as colds and the flu. Is there any way that sanitation could limit a zombie epidemic? What needs to be cleaned up, and how?
Harnessing Our Own Immune System to Protect Us from Disease
Another revolution in disease prevention was vaccination. Like quarantine and sanitation, early “vaccines” were developed not based on an understanding of biology; instead, they were based on the observation that people who survived infection with a particular disease were immune (protected against another infection) for life. There is evidence that Chinese, Indian, and African cultures deliberately infected nonimmune people with smallpox to generate immunity (this is called inoculation) before the 1600s. This process was controversial and dangerous, as a live virus that carried the risk of a full-on infection was used as the inoculum. Over time, inoculation gained acceptance, and by the late 1700s Benjamin Franklin was promoting inoculation as a way to protect public health. There is evidence that George Washington, John Adams, and other founding fathers all received an inoculation against smallpox.
As our understanding of biology developed, we came to understand that what vaccines do is stimulate our immune system, essentially giving our body a head start in treating disease. Our body is good at recognizing invaders—things that shouldn’t be there—but it takes time to mount a defense. Vaccination teaches our immune system what the invader looks like—so that the next time we are exposed to this invader, our immune system is able to react much more quickly. This rapid response protects us from developing a disease, even if we are exposed to an infectious agent.
Vaccination protects not only the individual who receives the vaccine but also that person’s community. When there is a critical mass of individuals who are vaccinated, a disease cannot gain a foothold in a community, and individuals who cannot be immunized (newborn infants or immunocompromised individuals who could be sickened by the vaccine) are also protected. This is called herd immunity. Herd immunity protects the most vulnerable in our population. Can we use herd immunity to our advantage in our battle against the zombies?
In the past century, widespread vaccination campaigns against what were called childhood diseases have changed the face of childhood in developed countries. Diseases that were once commonplace are now rare—and parents no longer worry about their children suffering and dying before age five of diseases like measles, polio, or diphtheria. That said, because we are now a generation out from having seen this suffering, we are becoming complacent. There are places in the United States where vaccination rates have dropped below the threshold needed for herd immunity, and we are seeing a resurgence of such diseases as measles and pertussis.
It’s All About Balance …
The biological imperative of a living thing is to reproduce and ensure the continuation of its species. This is true whether you are a virus; a single-celled bacterium; or a complex multicellular creature, such as a human.
For an infectious agent to survive and prosper, it must not only infect and reproduce in its first host but also be transmitted to infect other hosts so the cycle can continue. An infectious agent that rapidly kills everyone it infects, without a chance for the infected to pass on the infection, will soon die out. Latency—or a delay between infection and onset of symptoms—is one way that microbes continue their spread. Applied to zombies, zombies that are voraciously hungry and quickly eat the brains of all living humans will soon run out of food (hosts). Similarly, if zombies rapidly convert all humans to zombies, they will also soon run out of brains. There must be a balance. Zombies must be able to infect new humans, and capture others for their brains. But there must be some humans who survive and reproduce—for if not, zombiekind will also be in trouble.
Power in Numbers
The world is teeming with microorganisms, and just as there is tremendous variation among humans (skin, hair, and eye color; height; weight; and so on), there is tremendous variation among microbes—even among those of the same species. This variation helps them survive and thrive in a hostile human environment. Microbes reproduce quickly, and so if a variant is advantageous—helps it grow faster or survive a challenge (such as antibiotic treatment)—the microbes with that advantageous variant (mutation) will outcompete their “siblings.” Soon the population will be dominated by the microbes with the advantageous mutation.
You can easily imagine the role of variation in the zombie model. Some zombie variants will have an advantage over their fellow zombies (for instance, being faster), and other variations will provide a disadvantage (for example, zombies with fins instead of legs). Still others will have no significant effect (positive or negative) in the current environment. If the fast zombies are better at infecting humans than normal zombies (and certainly better than fin-legged zombies), soon there will be more fast zombies in the population. For now, being a fast zombie is helpful, but the tables could turn (the key phrase was “in the current environment”), and at some point a different mutation might confer a bigger advantage. Imagine if the humans built an ark or relocated to an island in the middle of the sea … which zombies would fare better then?